In our Previous Post, we mentioned how to install Maven on your machine, and in this post, we will see how to create Project Maven.
There are two ways of creating Project Maven. You can either use the command prompt or do it from within the Eclipse IDE. Let’s take a look at both methods!
Check Prerequisites
It’s important to make sure that your Eclipse is configured correctly before you try to create a Maven project. Make sure you have the following:
- Apache Maven 3.8.6
- JDK
- Eclipse
| Post On: | Create Project Maven |
| Post Type: | Maven Tutorial |
| Published On: | www.softwaretestingo.com |
| Applicable For: | Freshers & Experience |
Create a New Project Maven from Command Prompt
To create a Maven project, Go to your Windows operating system and open the command prompt.

Go to the specific folder where you want to create your project maven and type the below command.
mvn archetype:generate -DgroupId=SoftwareTestingo -DartifactId=DemoMavenProject -DarchetypeArtifactId=maven-archetype-quickstart -DinteractiveMode=false

When you create a new project in Maven, the DartifactId represents the name of your project, while DarchetypeArtifactId specifies what kind of project it is.
For example, there are web projects, java projects, and so on. You can find the entire list of available types of Maven projects here.
After entering the above command, press enter to create the Project Maven.
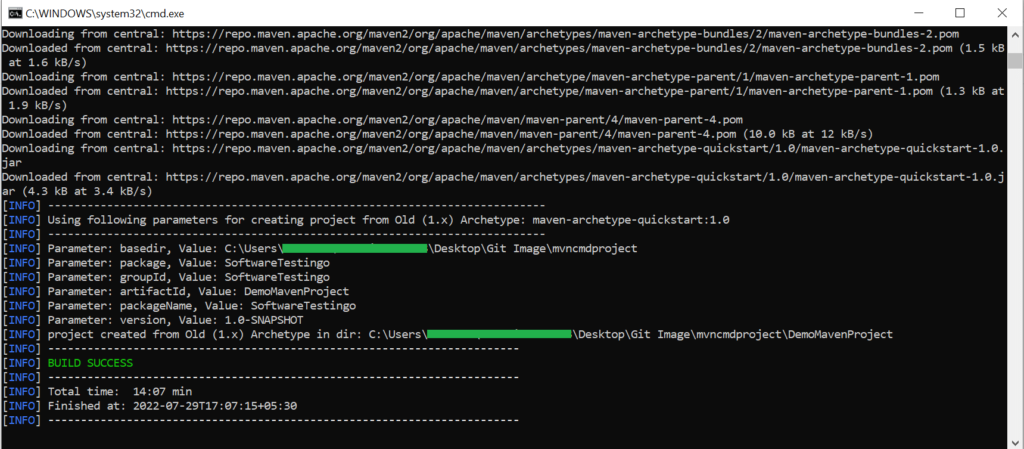
Notes: If your build is failing, make sure to check the version of Maven in your pom.xml file. It needs to match the version you have installed on your machine.
You should now go to the project location in order to see the newly created maven project. Once you are there, open the pom.xml file that resides within the project folder. By default, POM is generated like this.

<project xmlns="http://maven.apache.org/POM/4.0.0" xmlns:xsi="http://www.w3.org/2001/XMLSchema-instance"
  xsi:schemaLocation="http://maven.apache.org/POM/4.0.0 http://maven.apache.org/maven-v4_0_0.xsd">
  <modelVersion>4.0.0</modelVersion>
  <groupId>SoftwareTestingo</groupId>
  <artifactId>DemoMavenProject</artifactId>
  <packaging>jar</packaging>
  <version>1.0-SNAPSHOT</version>
  <name>DemoMavenProject</name>
  <url>http://maven.apache.org</url>
  <dependencies>
    <dependency>
      <groupId>junit</groupId>
      <artifactId>junit</artifactId>
      <version>3.8.1</version>
      <scope>test</scope>
    </dependency>
  </dependencies>
</project>
Maven Folder Structure
And the default folder structure of Maven will be looking something like the below:
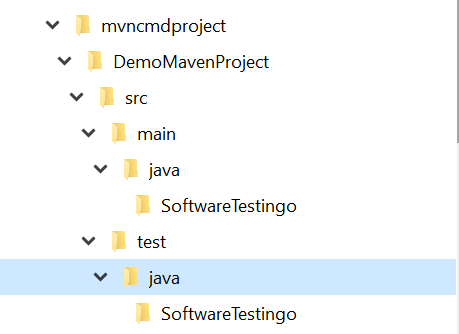
Notes: If you’re looking to get your test cases recognized by Maven, be sure to put them under src > test > java > SoftwareTestingo. Anything else, and Maven will ignore them.
Maven Project to work with Eclipse
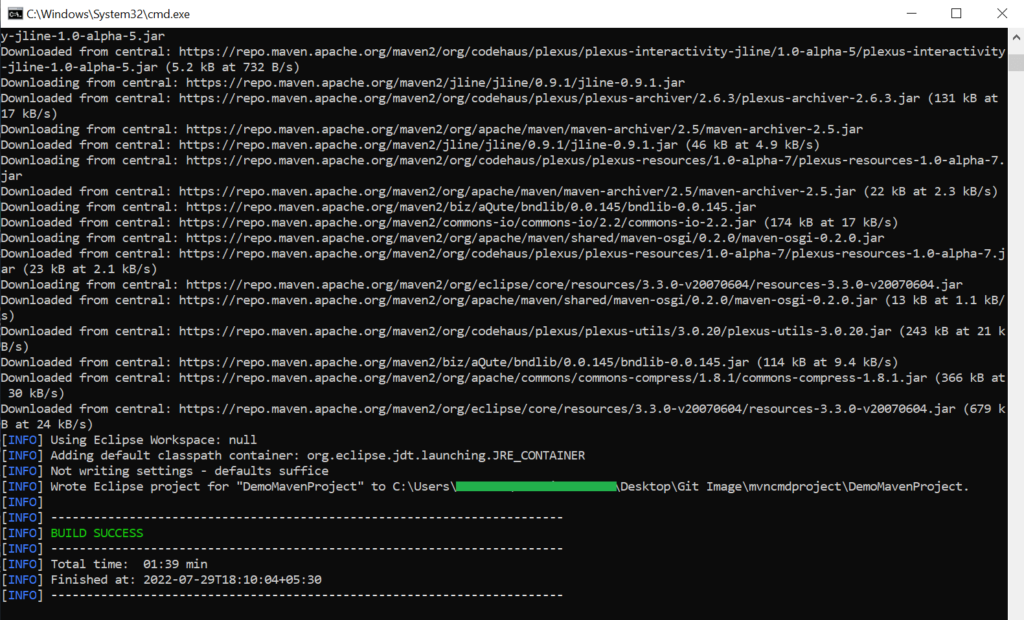
We have created a Project Maven, but it is not compatible with the Eclipse IDE. So, to make it compatible, we have to run the “mvn eclipse:eclipse”.
To run the command, go to the project directory in the command prompt, and after that, you can run the command.
Import Maven Project into Eclipse
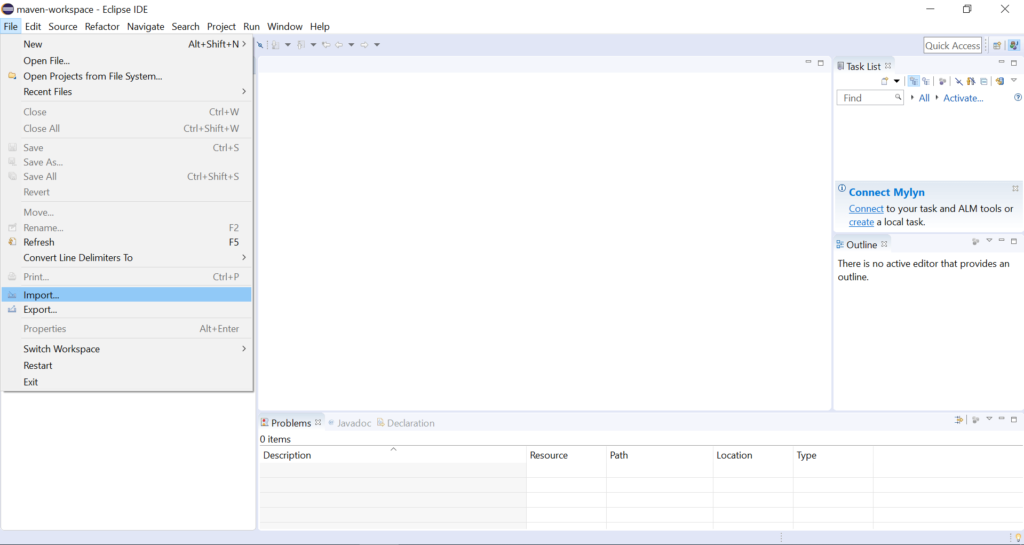
As the project maven is compatible with Eclipse, we can now import this project to Eclipse by following the steps below.
Open the Eclipse application Choose File from the menu and Select the Import option.
Then Select Existing Projects in the Workspace option and click next.
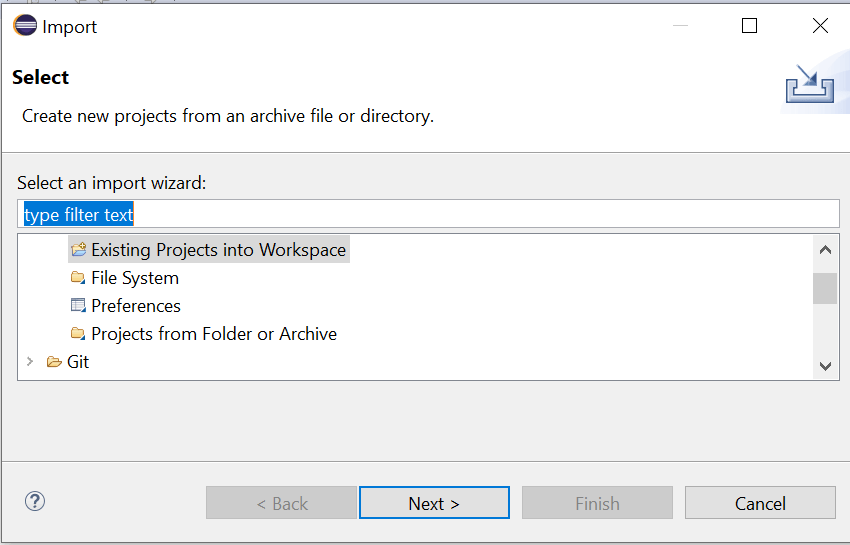
Browse the Maven project folder and Click the Finish button.
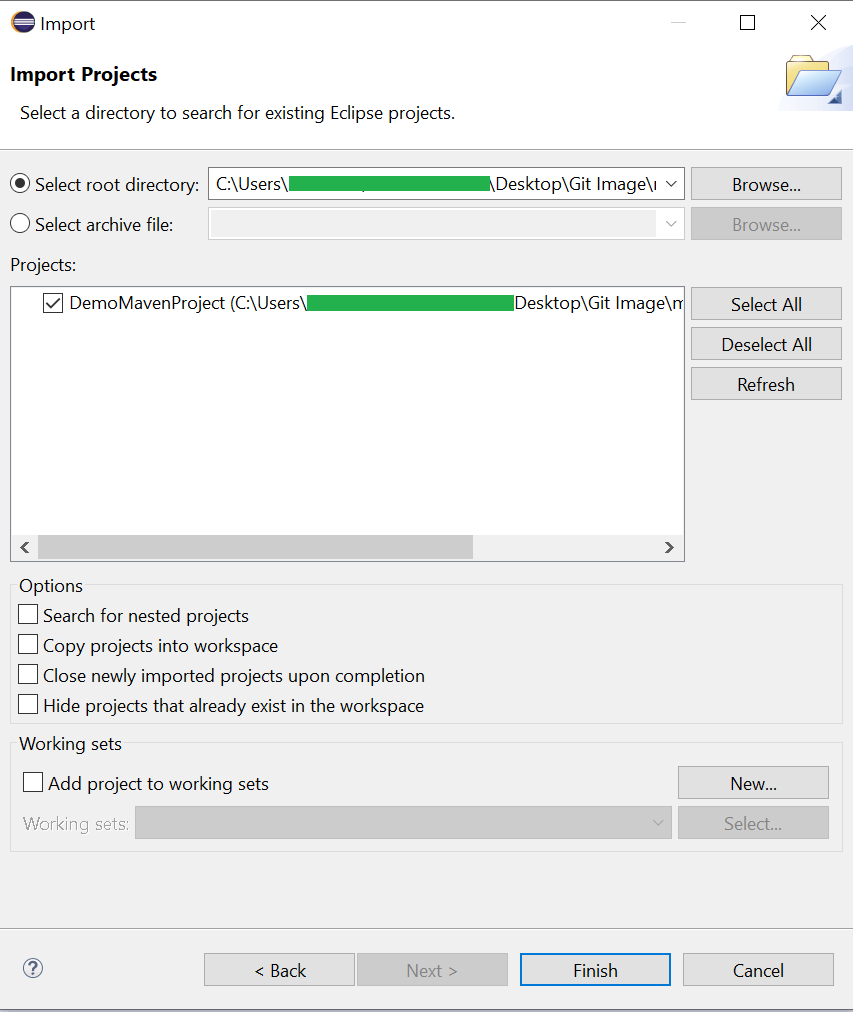
After clicking Finish, you can see that the project will be added to the project explorer section of Eclipse. That will be looking something like the below image:
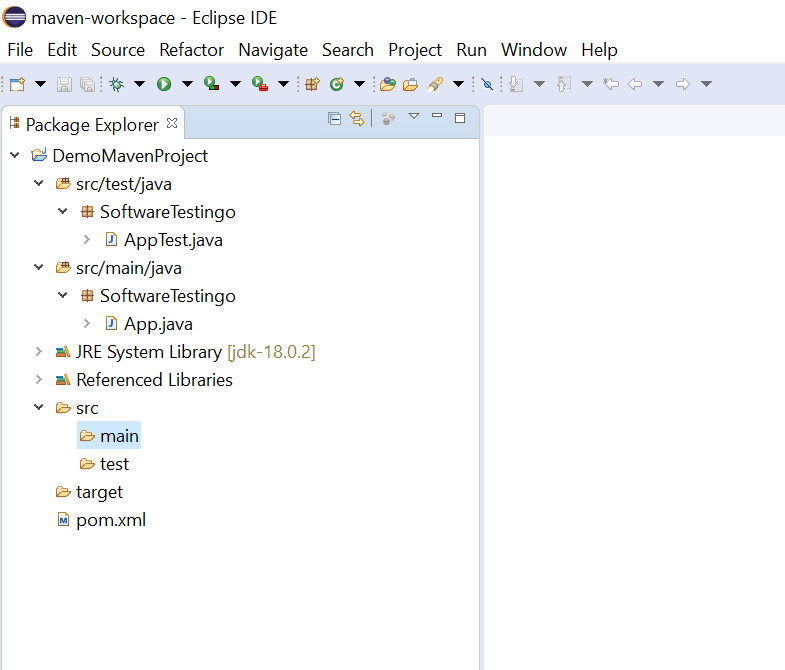
When modifying the POM, you’ll want to add the compiler plugin. This tells Maven which JDK version to compile your project with and ensures that everything will run smoothly.
If you are using OpenJDK Java, then you have to add the below code to your POM.xml file
  <!-- If you Are Using OpenJDK -->
	<plugin>
		<groupId>org.apache.maven.plugins</groupId>
		<artifactId>maven-compiler-plugin</artifactId>
		<version>3.10.1</version>
		<configuration>
			<release>18</release>
		</configuration>
	</plugin>
If you are using Oracle Java, then you have to add the below code to your POM.xml file
<!-- If you Are Using Java JDK -->
    <plugin>
    <groupId>org.apache.maven.plugins</groupId>
    <artifactId>maven-compiler-plugin</artifactId>
    <version>3.10.1</version>
	<configuration>
			<source>1.8</source>
			<target>1.8</target>
		</configuration>
    </plugin>
By default, your POM.xml file has the old version of the Junit dependency, but we will update it to the new version of the TestNG dependency like this.
<dependency>
    <groupId>org.testng</groupId>
    <artifactId>testng</artifactId>
    <version>7.6.1</version>
    <scope>test</scope>
</dependency>
After updating everything, if you check your Maven pom.xml file, then it will look something like the below:
<project
	xmlns="http://maven.apache.org/POM/4.0.0"
	xmlns:xsi="http://www.w3.org/2001/XMLSchema-instance"
  xsi:schemaLocation="http://maven.apache.org/POM/4.0.0 http://maven.apache.org/maven-v4_0_0.xsd">
	<modelVersion>4.0.0</modelVersion>
	<groupId>SoftwareTestingo</groupId>
	<artifactId>DemoMavenProject</artifactId>
	<packaging>jar</packaging>
	<version>1.0-SNAPSHOT</version>
	<name>DemoMavenProject</name>
	<url>http://maven.apache.org</url>
	<dependencies>
		<!-- TestNG -->
		<dependency>
			<groupId>org.testng</groupId>
			<artifactId>testng</artifactId>
			<version>7.6.1</version>
			<scope>test</scope>
		</dependency>
	</dependencies>
	<build>
		<plugins>
			<!-- If you Are Using OpenJDK Java JDK -->
			<plugin>
				<groupId>org.apache.maven.plugins</groupId>
				<artifactId>maven-compiler-plugin</artifactId>
				<version>3.10.1</version>
				<configuration>
					<release>18</release>
				</configuration>
			</plugin>
			<plugin>
				<groupId>org.apache.maven.plugins</groupId>
				<artifactId>maven-surefire-plugin</artifactId>
				<version>3.0.0-M7</version>
			</plugin>
		</plugins>
	</build>
</project>
First, make the necessary modifications to your POM file. Then, follow the instructions for configuring Maven projects in Eclipse. Open a command prompt and navigate to your Maven project directory. Type “mvn eclipse:eclipse” at the command prompt.
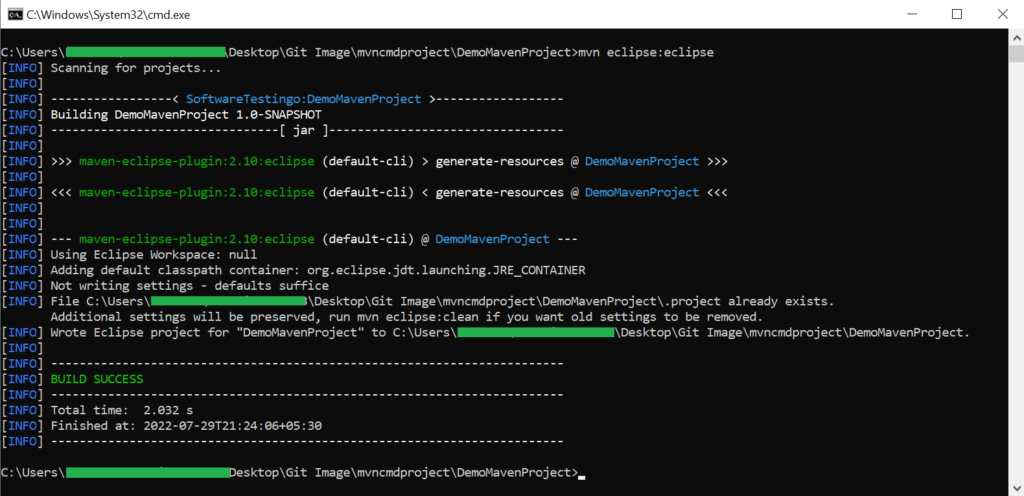
Notes: If you run the command for the first time, then it will download all the related Jars from the central repository.
How to Run your first Maven Test?
To run the test program, right-click on the pom.xml file and run as an option. After that, select Maven Test.
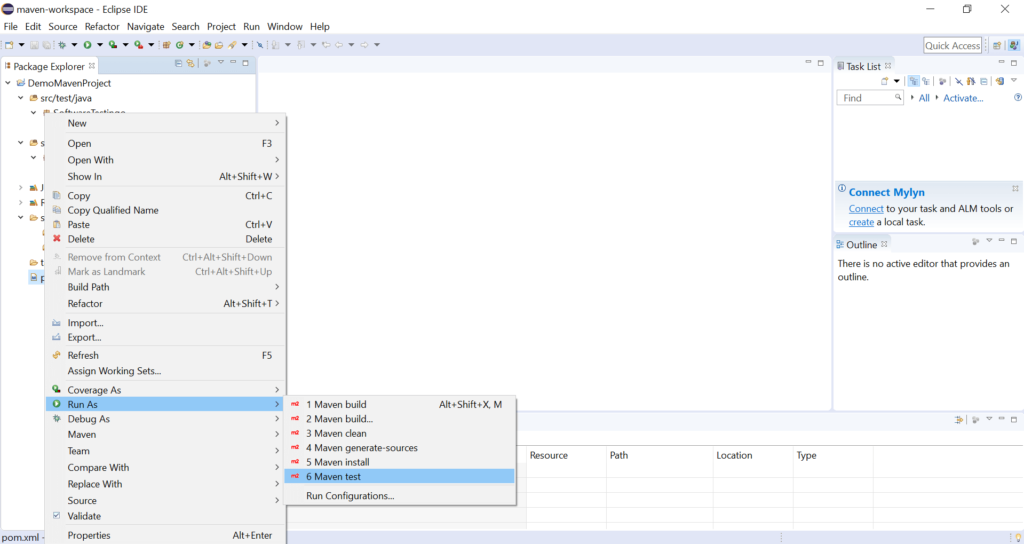
After running the test in the Eclipse console, you can see some information below:
[INFO] Results:
[INFO]
[INFO] Tests run: 1, Failures: 0, Errors: 0, Skipped: 0
[INFO]
[INFO] ------------------------------------------------------------------------
[INFO] BUILD SUCCESS
[INFO] ------------------------------------------------------------------------
[INFO] Total time:  5.528 s
[INFO] Finished at: 2022-07-29T22:55:12+05:30
[INFO] ------------------------------------------------------------------------
Eclipse Maven Integration
If you’re using a recent version of Eclipse, Maven is probably already included! So no need to go through the hassle of installing it from the marketplace. However, if you’re using an older version of Eclipse, you’ll need to install Maven explicitly. Once it’s set up, though, you’ll be able to enjoy all the features Maven has to offer right from within Eclipse!
Tweaking Eclipse preferences
Before we get started with our exciting project in Eclipse, there are just a few preferences we should tweak to make things run more smoothly. This step isn’t required, but it’ll make life easier as we go along!
Navigate to your Maven menu by selecting Eclipse -> Preferences. Once the Preferences dialogue pops up, choose Maven on the left. This will show you all of the different configuration settings for Maven. The options “Download Artifact Sources” and “Download Artifact JavaDoc” are unchecked by default, but we want to make sure they’re both checked off. After that, click OK
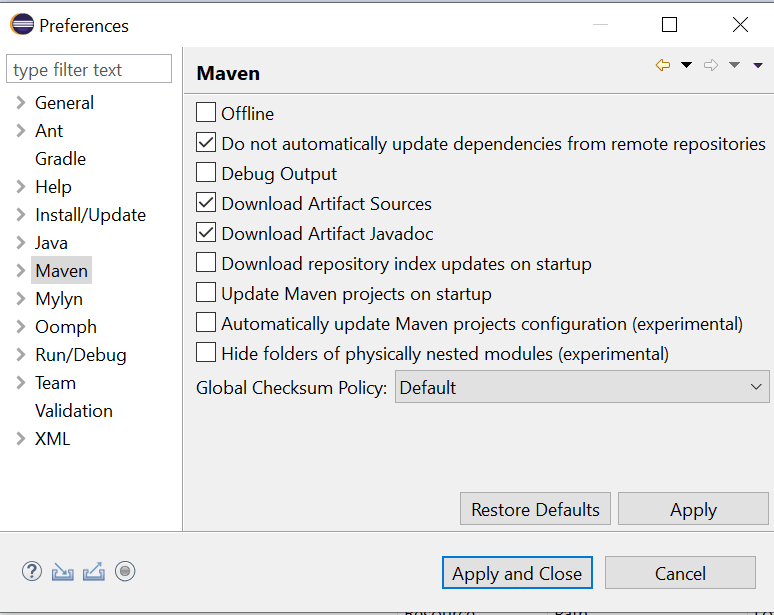
We want this because it helps a lot when using code autocompletion in Eclipse. With the Javadoc available, Eclipse will automatically read it and provide documentation in a tooltip. It’s not required, but very useful.
How do you create a new maven project in Eclipse?
If you’re looking to create a Maven project in Eclipse, there are two methods you can follow. Above, we have discussed the first method, which is using the command prompt method. The second method entails creating the project directly within Eclipse rather than first creating it outside of the IDE and then importing it.
To create Project Maven in Eclipse, follow the below steps:
Open your Eclipse application, choose New from the File Menu, and then select Other.
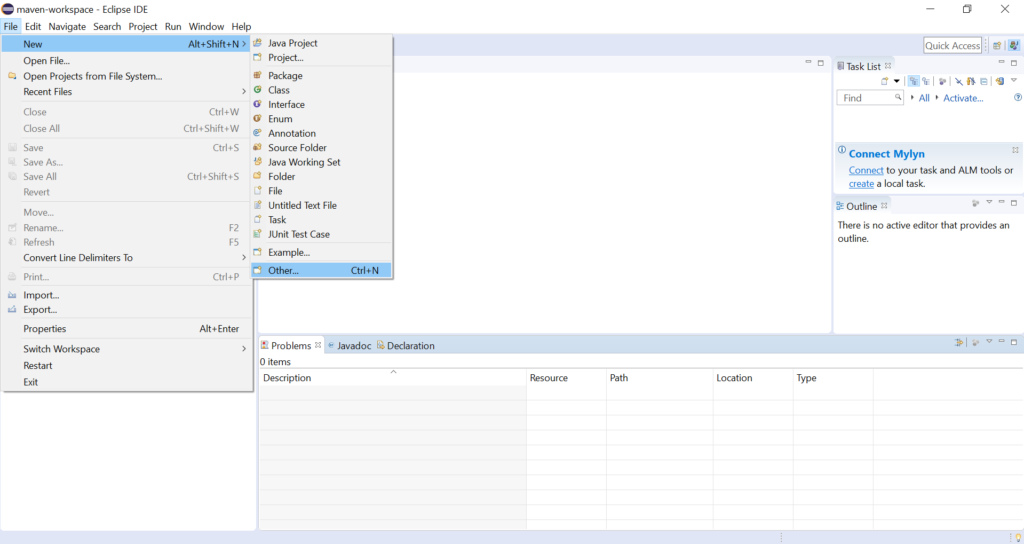
It will open New Wizard, there you have to select the Maven Project and Click Next.
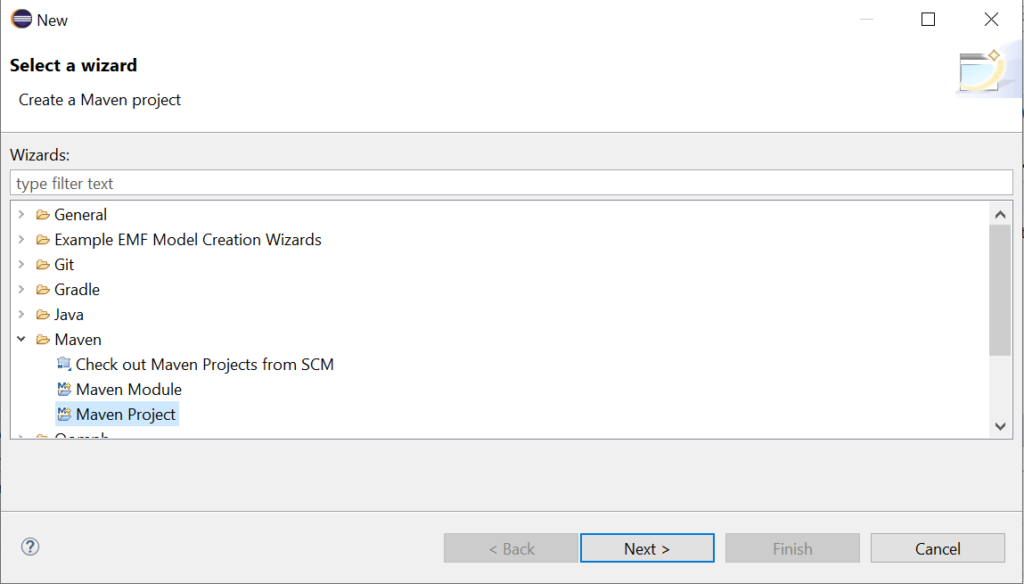
Make sure you un-check the ‘Use default Workspace location’ so that you can choose your own workspace for setting up your Maven project! With the help of the Browse button, of course. and Then Click Next.
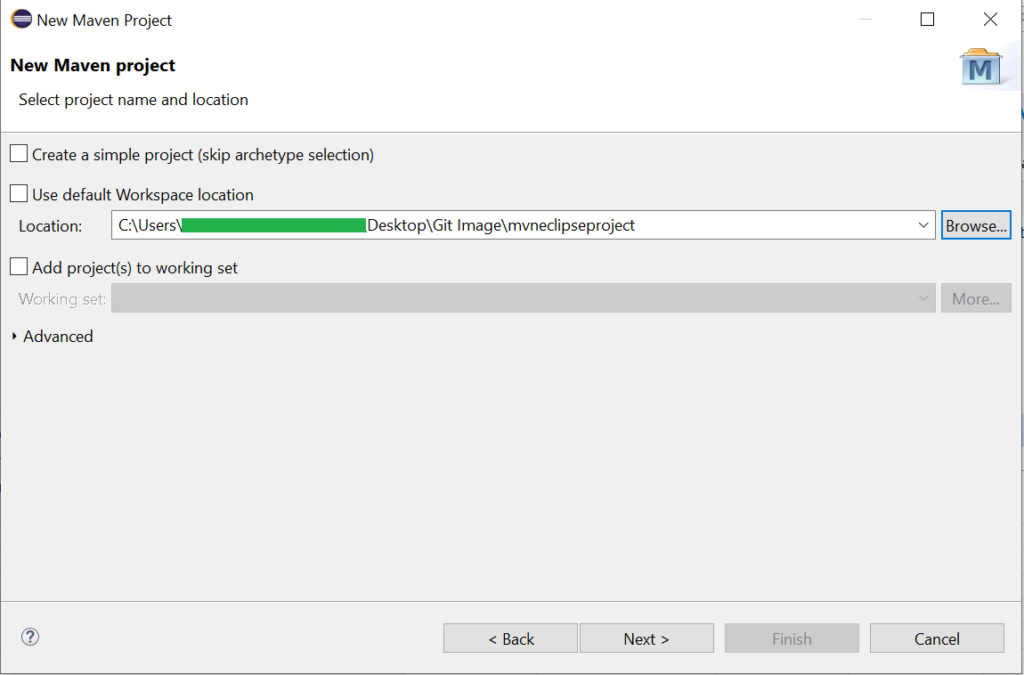
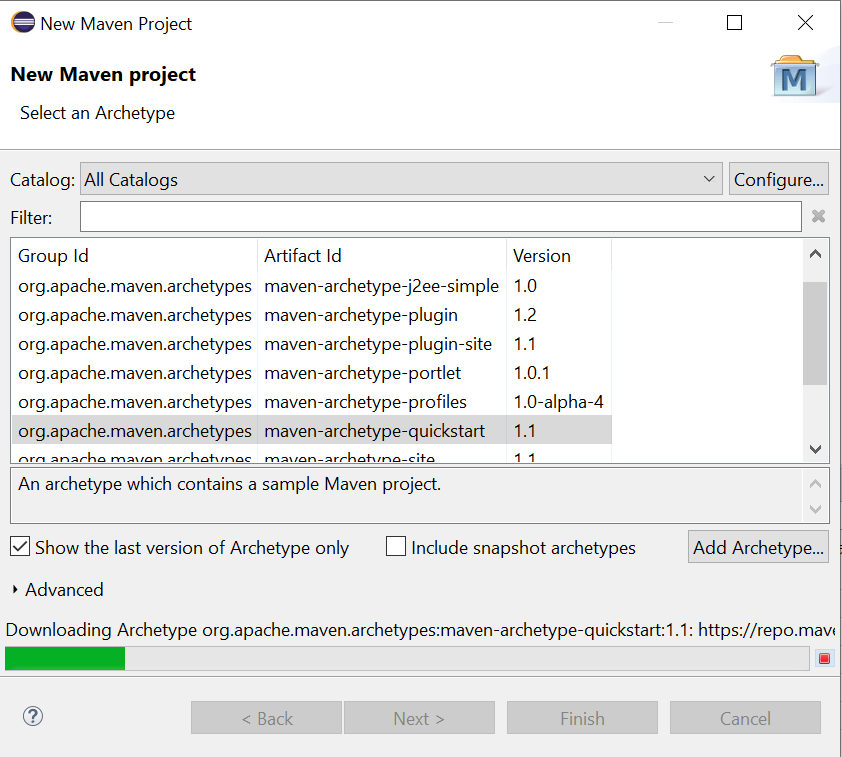
Select “maven-archetype-quickstart” from the list of archetypes and then click next.
In the New Maven Project window, mention the “Group Id & Artifact Id” and Click Finish.
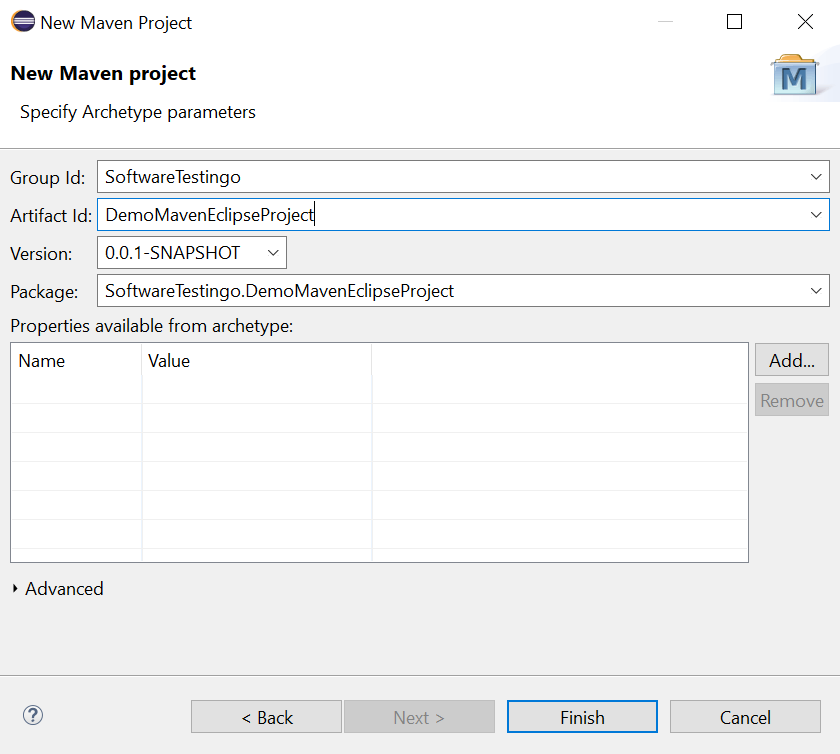
Notes: The Artifact ID represents your Project Name.
You should visit the project location to see the newly created Maven project. Then, open the pom.xml file in the project folder. The POM is generated like this by default:
<project xmlns="http://maven.apache.org/POM/4.0.0" xmlns:xsi="http://www.w3.org/2001/XMLSchema-instance"
  xsi:schemaLocation="http://maven.apache.org/POM/4.0.0 http://maven.apache.org/xsd/maven-4.0.0.xsd">
  <modelVersion>4.0.0</modelVersion>

  <groupId>SoftwareTestingo</groupId>
  <artifactId>DemoMavenEclipseProject</artifactId>
  <version>0.0.1-SNAPSHOT</version>
  <packaging>jar</packaging>

  <name>DemoMavenEclipseProject</name>
  <url>http://maven.apache.org</url>

  <properties>
    <project.build.sourceEncoding>UTF-8</project.build.sourceEncoding>
  </properties>

  <dependencies>
    <dependency>
      <groupId>junit</groupId>
      <artifactId>junit</artifactId>
      <version>3.8.1</version>
      <scope>test</scope>
    </dependency>
  </dependencies>
</project>
The default folder structure will look like the below image:
Notes: If you want your test cases to be considered by Maven, make sure they reside under src > test > java > PackageName. Anything else will be ignored.
Modify the pom.xml file with the Latest TestNG and save the file.
<dependency>
    <groupId>org.testng</groupId>
    <artifactId>testng</artifactId>
    <version>7.6.1</version>
    <scope>test</scope>
</dependency>
How to Run the Maven Project?
To run your Maven test, right-click on the pom.xml file, select Run, and then select Maven Test.
If you run your pom.xml file, it will give you an error because there are no compiler plugins available on your pom.xml file. So you have to add the compiler in the pom.xml file like below.
	<build>
		<plugins>
			<!-- If you Are Using Java JDK -->
			<plugin>
				<groupId>org.apache.maven.plugins</groupId>
				<artifactId>maven-compiler-plugin</artifactId>
				<version>3.10.1</version>
				<configuration>
					<source>1.8</source>
					<target>1.8</target>
				</configuration>
			</plugin>
			<plugin>
				<groupId>org.apache.maven.plugins</groupId>
				<artifactId>maven-surefire-plugin</artifactId>
				<version>3.0.0-M7</version>
			</plugin>
		</plugins>
	</build>
After updating everything, if you check your Maven pom.xml file, then it will look something like the below:
<project
	xmlns="http://maven.apache.org/POM/4.0.0"
	xmlns:xsi="http://www.w3.org/2001/XMLSchema-instance"
  xsi:schemaLocation="http://maven.apache.org/POM/4.0.0 http://maven.apache.org/xsd/maven-4.0.0.xsd">
	<modelVersion>4.0.0</modelVersion>
	<groupId>SoftwareTestingo</groupId>
	<artifactId>DemoMavenEclipseProject</artifactId>
	<version>0.0.1-SNAPSHOT</version>
	<packaging>jar</packaging>
	<name>DemoMavenEclipseProject</name>
	<url>http://maven.apache.org</url>
	<properties>
		<project.build.sourceEncoding>UTF-8</project.build.sourceEncoding>
	</properties>
	<dependencies>
		<dependency>
			<groupId>org.testng</groupId>
			<artifactId>testng</artifactId>
			<version>7.6.1</version>
			<scope>test</scope>
		</dependency>
	</dependencies>
	<build>
		<plugins>
			<!-- If you Are Using Java JDK -->
			<plugin>
				<groupId>org.apache.maven.plugins</groupId>
				<artifactId>maven-compiler-plugin</artifactId>
				<version>3.10.1</version>
				<configuration>
					<source>1.8</source>
					<target>1.8</target>
				</configuration>
			</plugin>
			<plugin>
				<groupId>org.apache.maven.plugins</groupId>
				<artifactId>maven-surefire-plugin</artifactId>
				<version>3.0.0-M7</version>
			</plugin>
		</plugins>
	</build>
</project>
Also, you have to update the AppTest.java file with the below piece of code because the default AppTest.java file has the Junit codes.
package SoftwareTestingo.DemoMavenEclipseProject;
import org.testng.annotations.Test;
public class AppTest
{
	@Test
	public void test()
	{
		System.out.println("Hi User");
	}
}
After running the pom.xml file. if everything is configured properly and the build is successful, then you will get the result something like the below:
[INFO] Results:
[INFO]
[INFO] Tests run: 1, Failures: 0, Errors: 0, Skipped: 0
[INFO]
[INFO] ------------------------------------------------------------------------
[INFO] BUILD SUCCESS
[INFO] ------------------------------------------------------------------------
[INFO] Total time:  7.218 s
[INFO] Finished at: 2022-07-30T10:38:12+05:30
[INFO] ------------------------------------------------------------------------
Conclusion:
In this blog post, we have learned both the ways of creating a Project Maven in Command prompt and using Eclipse. But after following the steps, if you still face any errors or confusion, then you can ask us in the comment section. Also, let us know if your organization is following any different methods for creating maven projects.


Nice information. Can you give information of bbd framework in details. It can be helpful Tu us.
Hi Sneha, Sure we will try to cover the BDD framework also.