In our previous post, we have discussed briefly HTTPS protocol and SSH protocol. Now in this post, we will discuss something which is related to SSH protocol which is Git / GitHub SSH Authentication. The advantages of SSH are that it’s more secure and convenient to use once you’ve finished the initial setup.
Github provides two different ways that you can authenticate with your repository – either over HTTPS with a password, or over SSH using private keys. If you want to switch between the two methods, you’ll just need to configure your local repo to use the new credentials.
| Post Type: | GIT Tutorial |
| Published On: | www.softwaretestingo.com |
| Applicable For: | Freshers & Experience |
| Get Updates: | Join Our Telegram Group |
So in this blog post, we will learn all the related topics about GitHub SSH Authentication:
- How to Establish Git GitHub SSH Authentication?
- How to Check Git GitHub SSH Keys In the Local Repository?
- Generating Public and Private Keys in GitHub
- How to Create SSH Keys?
- Adding SSH keys to GitHub
- Verifying Added SSH Key in GitHub Account
How to Establish Git GitHub SSH Authentication?
To do this visit to GitHub repository page.
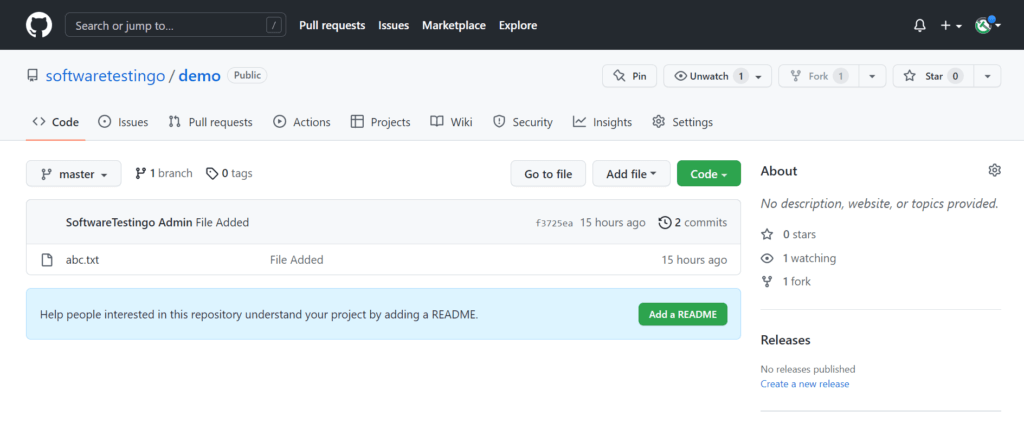
Click the Code button then it will open the popup.
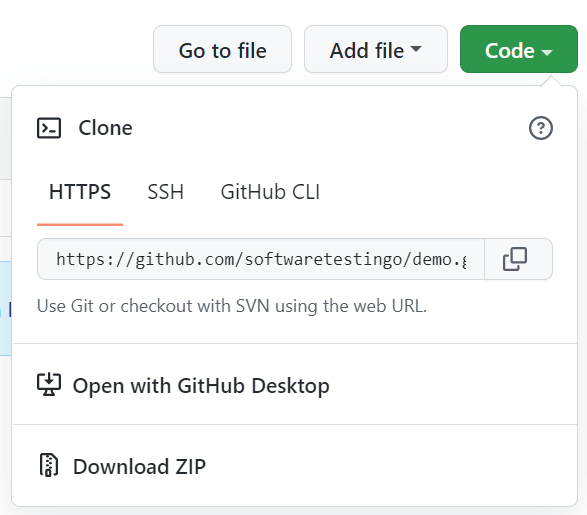
In the popup click on the SSH tab, and it will display the cloning options.
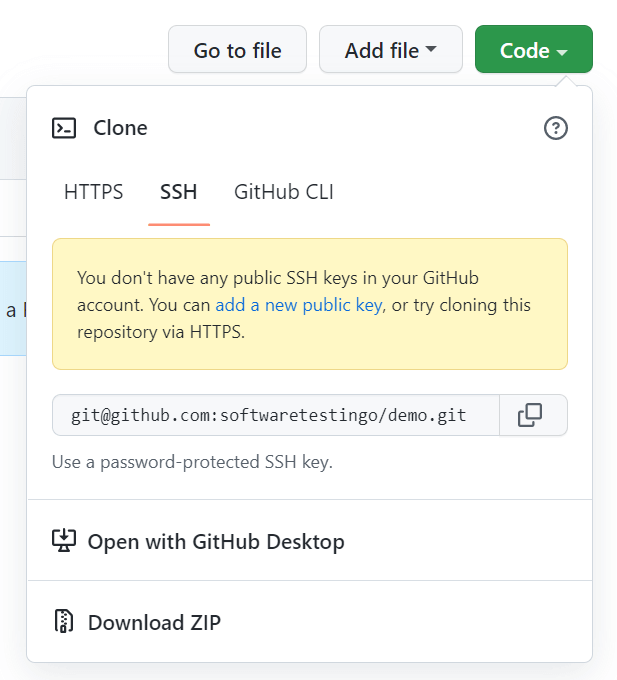
We received a notification that we do not currently have any public SSH keys in our GitHub account. The notification included links to generate a new SSH key. We need to generate this SSH key to communicate with the server securely via SSH.
It’s possible that the user already has an SSH key pair in their repository. So, before generating new keys, it’s a good idea to check if there are any existing ones.
How to Check Git GitHub SSH Keys In the Local Repository?
To check the SSH key you have to follow the below steps:
- Open Git Bash on your system.
- Type the below command and press enter
ls -l ~/.ssh

If the command is executed and you don’t have the keys, it will say “total 0.” If you do have the keys, then it will show something else.

Type the below command to check whether you have an SSH key on your local repository or not.
ls ~/.ssh

If there are no SSH keys you will get the appropriate message.
Generating Public and Private Keys in GitHub
Now that we’ve confirmed there are no keys associated with your remote account, let’s proceed with using SSH for authentication. For this, we’ll need to generate two types of keys.
- Private Keys
- Public Keys
Private Keys in Cryptography
If you’re using the SSH protocol to communicate with others over the internet, you’ll generate two types of keys. One of those keys is your private key, which you should never share with anyone else. Your private key is used for decrypting data, so it’s important to keep it safe and secure. Private keys can be up to 1024 or 2048 bits long, which makes them very difficult for hackers to guess.
Public Keys in Cryptography
The user generates two keys – a public key and a private key. The public key is shared with everyone and is used to encrypt the data that the user wants to send. Only the receiver can decrypt the data using their private key. This ensures that only the correct person can access the data.
How to Create SSH Keys?
I believe you know the basic knowledge of both the keys and their uses. Now let us try to understand how we can create these pair of keys using Git.
ssh-keygen -t rsa -C “FirstSSHKeys”
Before Execute this command, let us explain what is the meaning of the above command:

- ssh-keygen: If you want to generate an ssh key, we recommend using the ‘ssh-keygen’ tool. It’s a standard cryptographic key generation tool that comes pre-installed on Unix systems and Windows 10 onwards. If you’re using an older version of Windows, PuTTY is a great alternative.
- -t: This option lets us choose the type of key we want to generate. We can choose between DSA or RSA keys.
- rsa: If you choose this then this tells git to generate only the RSA key only.
- -C: This option indicates that we are about to mention a comment next to it.
- FirstSSHKeys: This is the comment. If you have multiple keys associated with your account, it is essential to comment on them. This will help keep your account organized and easy to manage.
You can now press enter to execute the above command.

After pressing enter you will see the message “Generating a public/private rsa key pair” which means that ssh-keygen is creating your keys. Once it’s done, it will ask you where you want to save them. The default location is fine as of now, so just press enter.

You will see a message asking you to enter a passphrase. This is an important step as this ensures that only authorized users can access the server. A strong passphrase would be at least 15 characters long and should contain numbers, special characters, and uppercase and lowercase letters.
But for now, we will proceed with the blank passphrase. Press enter twice for the passphrase and the same passphrase to generate the keys.

When you generate an SSH key pair with ssh-keygen, it creates a public key and private key. The private key is kept on your computer.
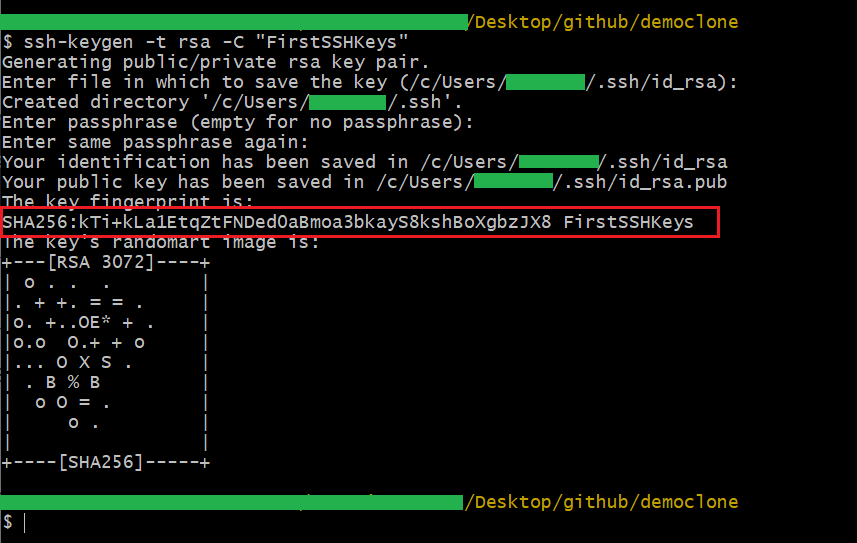
Great news, if you’re seeing the same screen! This means your key generation was successful. The highlighted line below shows the shorter version (or fingerprint) of your public key.
Also if you manually visit the location which you mentioned during the key generation for storing the keys you can find the files also.

Or you can verify this by executing the below command:
ls -l ~/.ssh

We’ve successfully generated the keys and added the public key to our GitHub account so we can communicate securely from our local machine to a remote GitHub server.
Adding SSH keys to GitHub
For adding the SSH key to the GitHub account you need to copy the SSH key which we created above. So open the generated .pub file in the text editor and copy the SSH key.

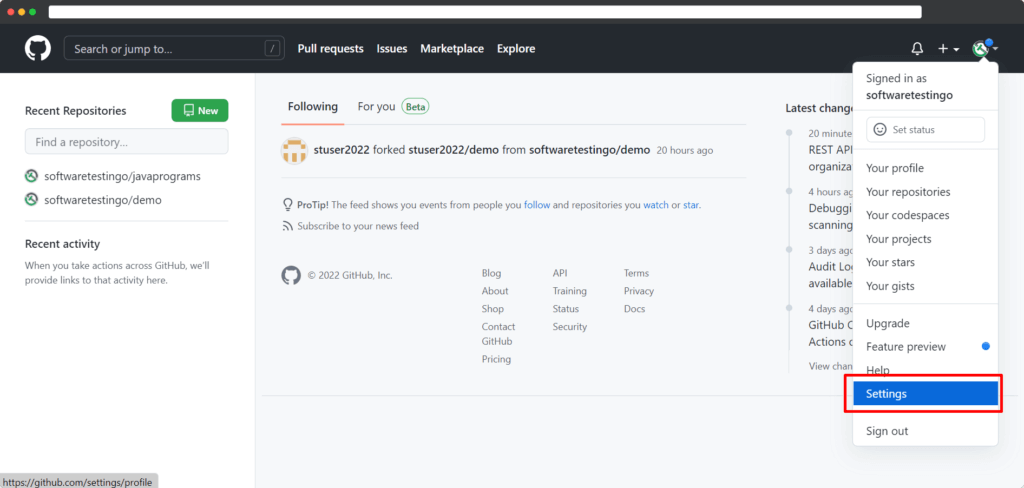
Now go to GitHub’s official website and Click on your profile picture and go to settings options.
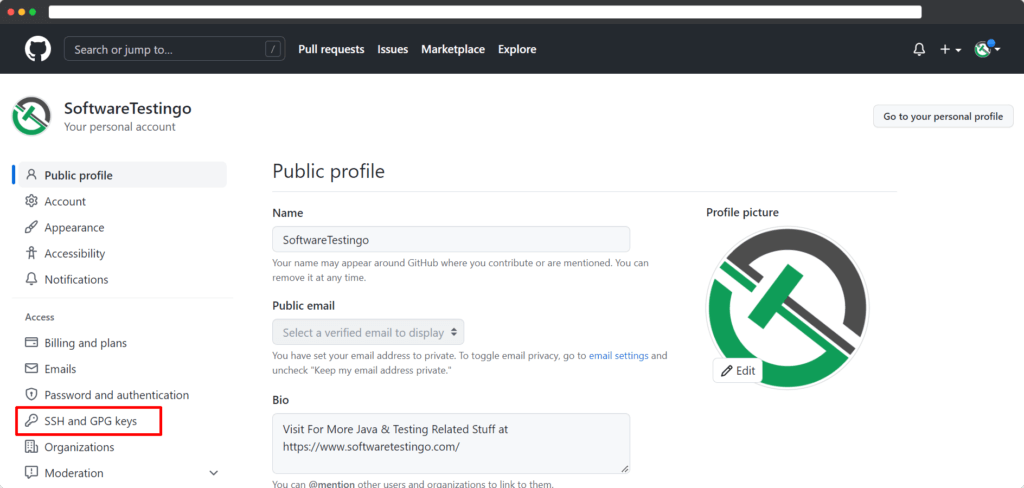
Then Go to the SSH and GPG keys option on the left side panel.
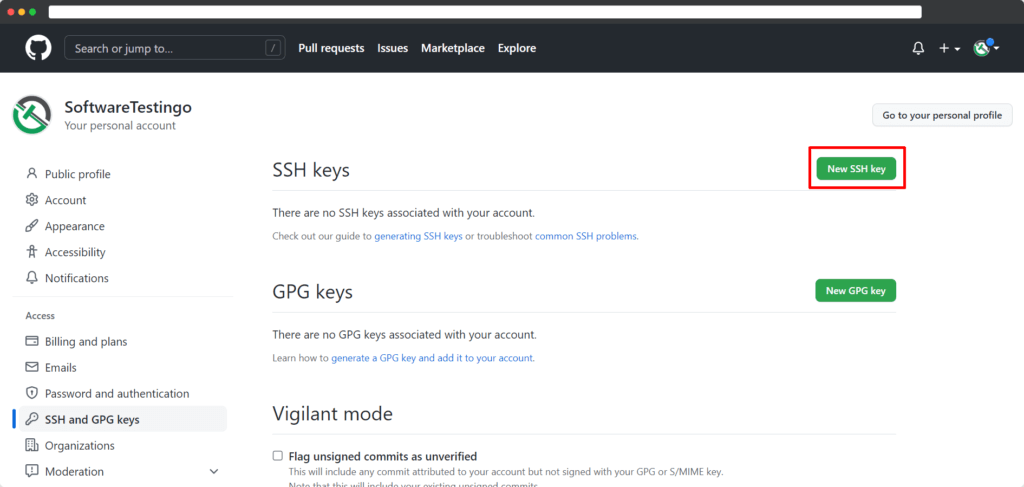
Then press the New SSH key to enter a new key in GitHub.
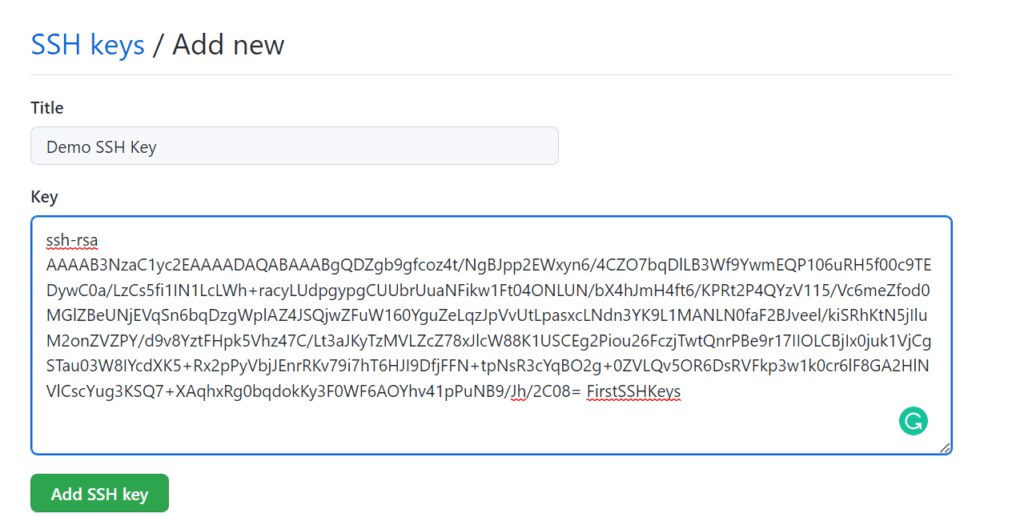
Enter the title, and the key in the text field given and press Add SSH Key.
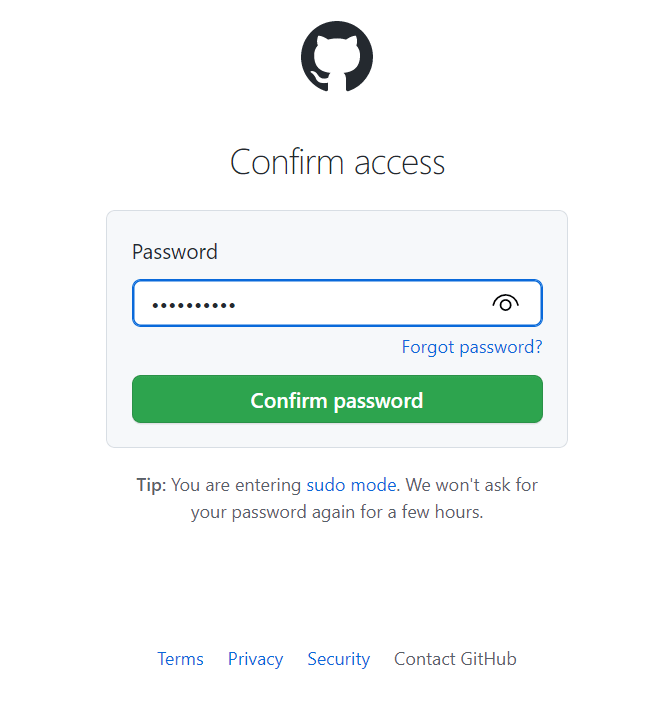
It will ask you to enter the password for confirmation.
After successfully adding the key it will look something like the below:
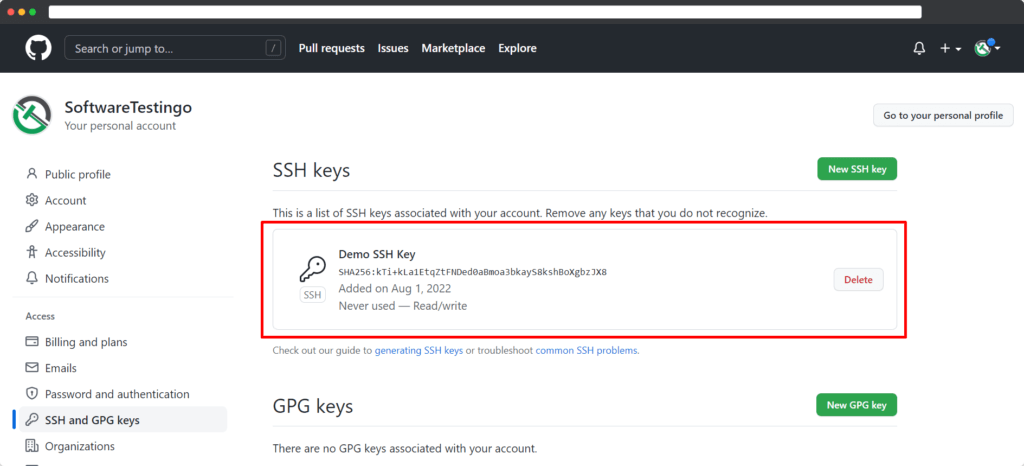
You have successfully added the SSH key to your GitHub account. To verify that the key has been linked correctly, follow these instructions.
Verifying Added SSH Key in GitHub Account
Now that you have generated an SSH key and added it to your GitHub account, you can check the key with your GitHub account using ssh and GitBash.
Go to Git Bash and execute the command.
ssh -T git@github.com

If you press enter, you will see a message on the screen that asks if you want to authenticate. Pressing Yes will confirm your authentication.

If you see a message with your name when you press enter, it means that you have verified the key successfully.

Great job! You’ve completed the tutorial on Git SSH Authentication. Generating, adding, and verifying keys can be a lot to do, but you did it! Remember that whether you use HTTPS or SSH is entirely up to your preference. If you’re more comfortable using HTTPS, go for it!
