In our previous Selenium Tutorial blog post, we covered the selenium fundamentals; now it’s time to start thinking about designing our automation selenium framework from scratch. When developing a framework, there are several key considerations:
- We have to think about the design.
- We have to think about how you will supply the data
- How do you write the test cases?
- How do you create the locator’s pages?
- What are the different components we need to create
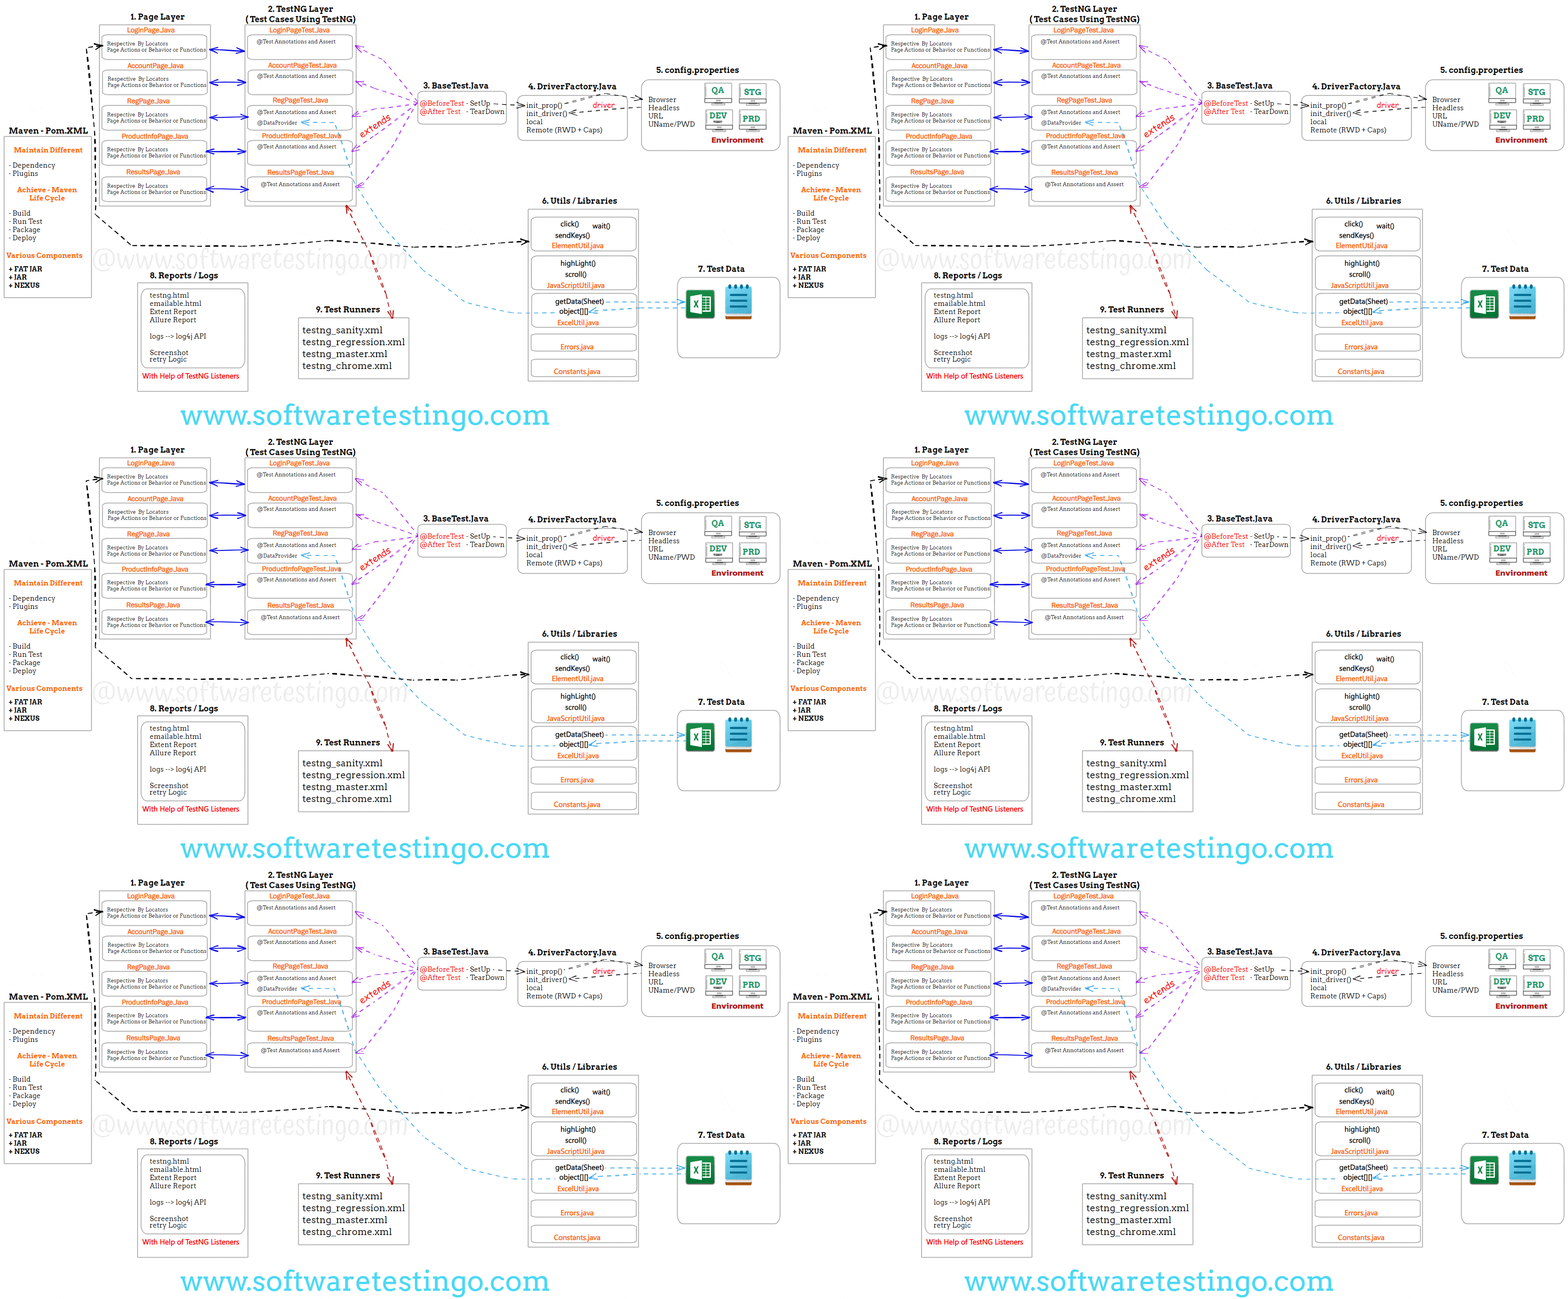
Before going through each component, let us see the complete automation framework architecture diagram.
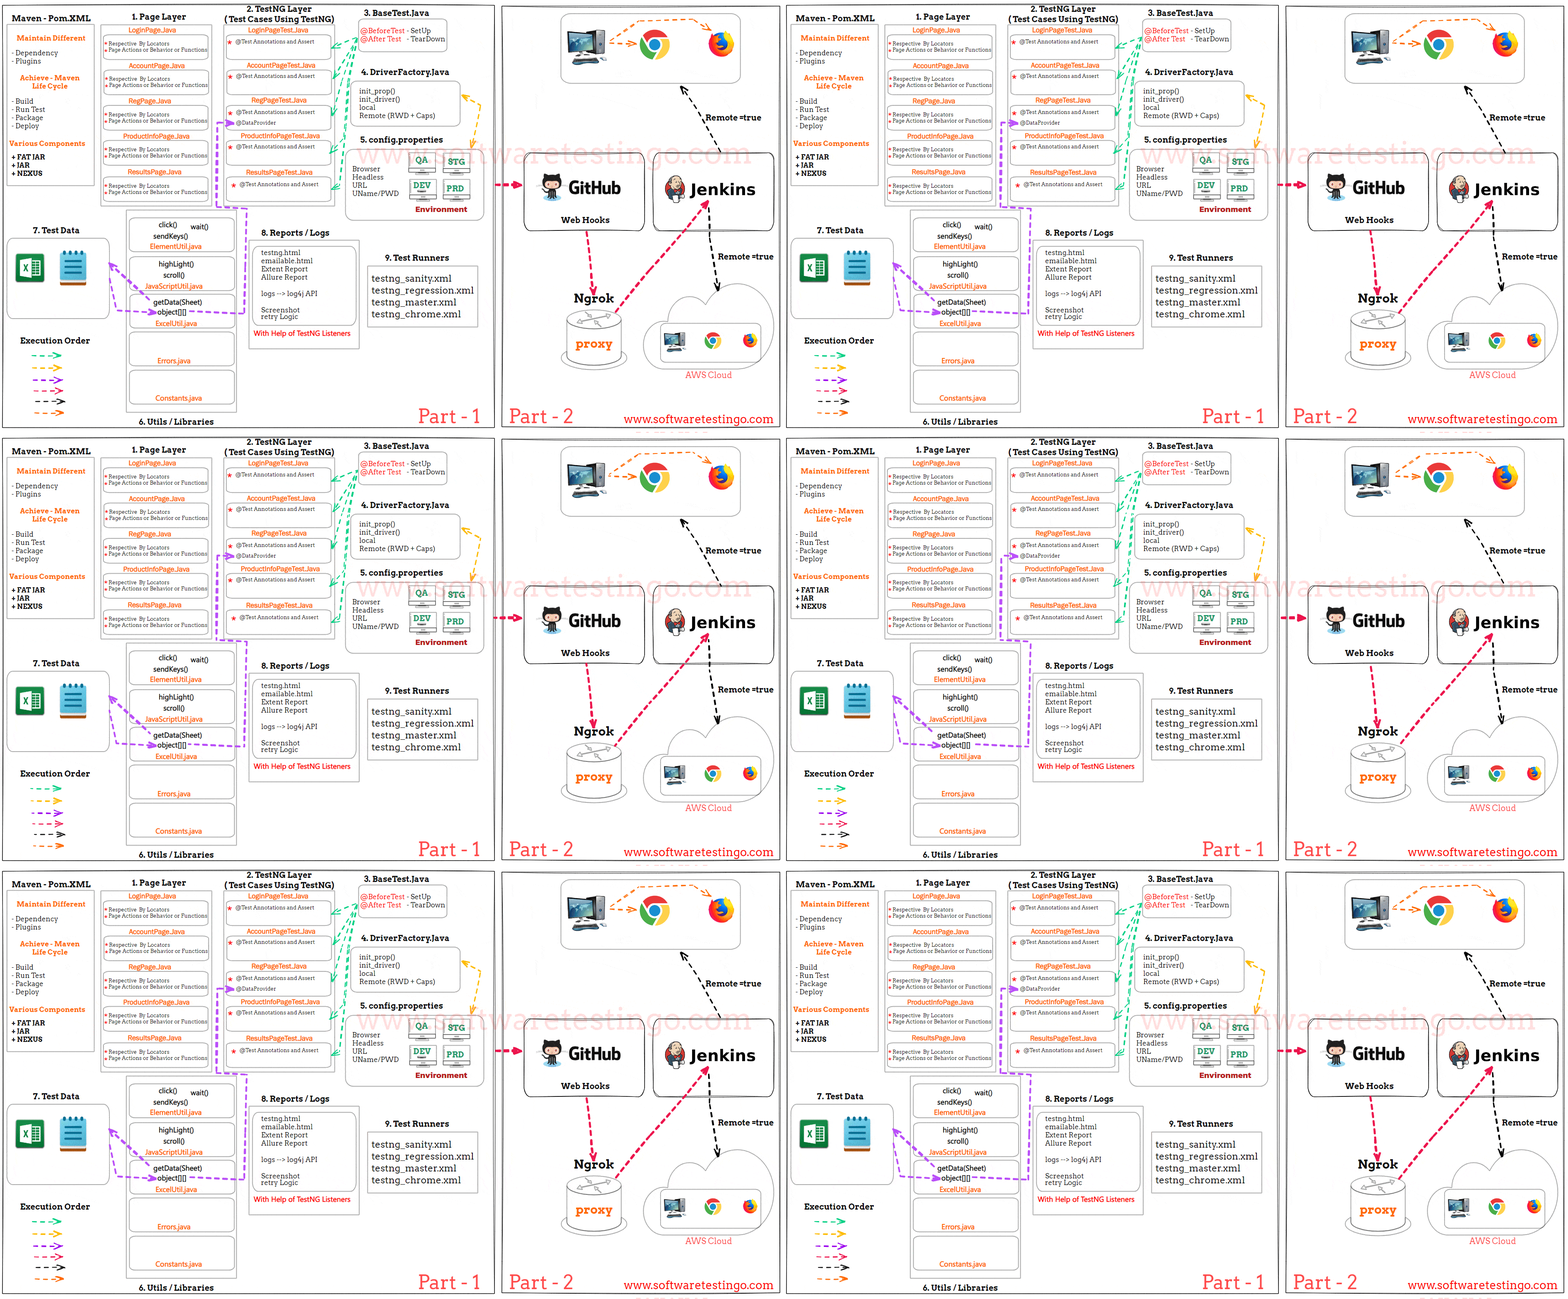
For future reference, you can download our Java Selenium Automation Framework Architecture Diagram or take a printout because it will help you a lot and give you a complete picture of the framework. And if someone asks you to tell me the framework’s architecture or structure, you can also tell exactly the same thing ( component ) in the interview.
For an easy understanding of the framework and features, we have divided the framework into two parts:
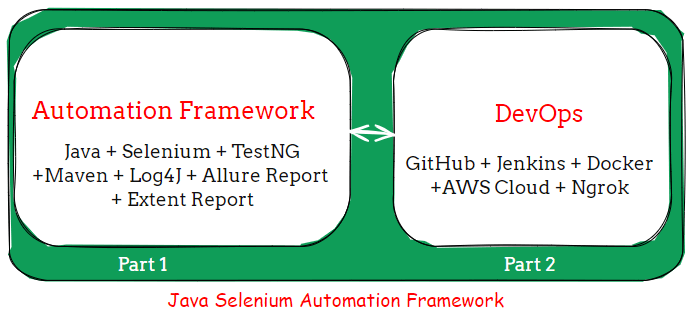
- Part 1(Automation) : Java + Selenium + TestNG +Maven + Log4J + Allure Report + Extent Report
- Part 2 (DevOps): GitHub + Jenkins + Docker +AWS Cloud + Ngrok
What is a Framework in selenium?
The framework is an organized way of creating different classes, components and test cases based on the requirement.
In our framework development, We are going to use one framework that is called a hybrid kind of approach. You may have heard about different frameworks, such as data-driven and keyword-driven.
While developing the framework, we will use one famous design pattern called the page object model. Most of the time, you may have heard about the page object model as a framework, but the page object model is a design pattern that provides a design, and based on that design, you have to design your page’s test cases accordingly.
Certain rules are predefined; if you are not following those rules and regulations, you are doing it wrong completely. So, we will see the specific design patterns we must use with the page object model.
Different Components or Layers of Selenium Framework
Here are the various components used in our framework:
Part 1 Components:
Part 2 Components:
Now, we will discuss each component individually to understand the framework better.
Component 0: Maven Pom.Xml
First, we must create a project in our editor, such as Eclipse or IntelliJ. But we must create a maven project to maintain the dependencies easily.
The first component we will use is the Maven POM.XML file; without the POM.XML file, we cannot proceed. Because inside the Pom.XMl file, we have to maintain various dependencies & plugins there.
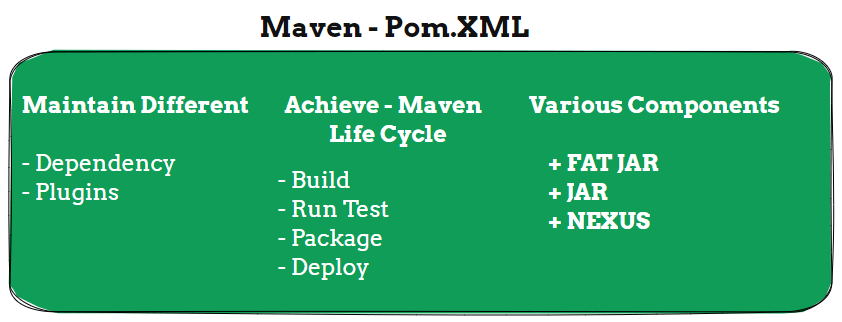
Various plugins are available in Maven; such as compiler plugin, SureFire plugin, and assembly plugin, and by using those plugins, we can achieve the complete Maven Life Cycle.
Component 1: Page Layer
After creating and adding dependencies and plugins into the Pom.xml, the next component we will work on is the Page Layer.
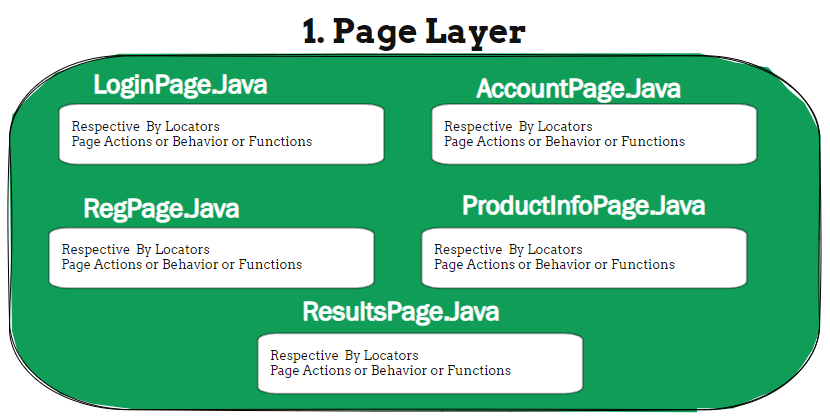
To develop our framework structure, we follow the page object model as a design pattern, so for every page, you have to create a separate Java class; this is a rule in the page object model.
Rule 1: The first rule says you must create a Java class for every page.
If you have 20 Pages on your application, you must create 20 Java classes for every page loginPage.java, homePage.java like this.
Can we use the Page Object Model for API automation?
We can’t use the Page object model for API automation because we have endpoint URLs in API, and when we call those, we get a response.
Under this page layer, we must create different pages like loginPage.java, accountPage.java, resultPage.java, productInfoPage.java, and registrationPage.java. Under these Java classes, we will write the respective page locators and page actions.
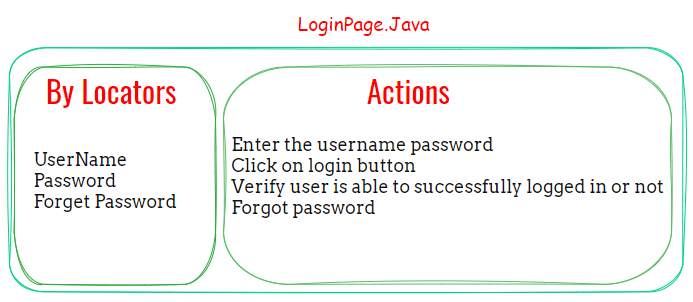
For Example:
The login page has a username, password, forgot password and other elements. so we have to create the respective locators.
Similarly, we can perform various actions on the login page:
- We have to enter the username and password.
- Click on the login button.
- Verify whether the user can successfully log in or not.
- Forgot password
These are all the behaviour of the login page, which means the functionality of the login page.
Component 2: TestNG Layer
Above, we have seen how to create separate Java files for each page and store locator and action details on those files.
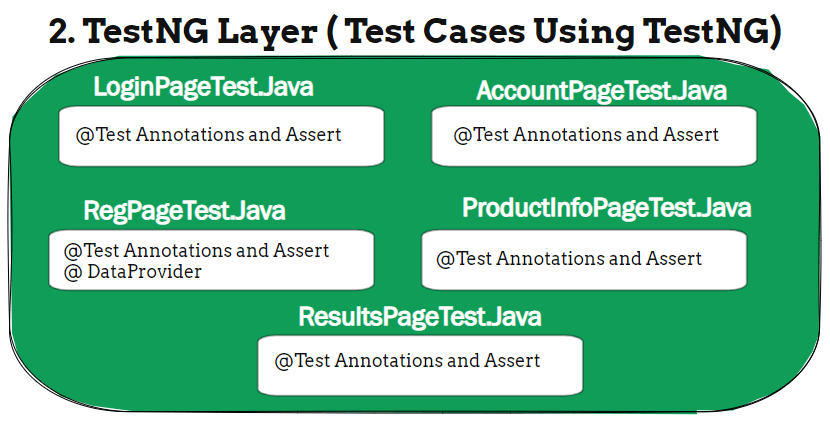
Then, we will write the test cases with the help of the TestNG library and create a TestNG Layer. We will write test cases Inside the TestNG layer, such as loginPageTest.java, accountPageTest.java, etc.
We will also use @Test annotations, assertions, and other concepts in the test cases.
Component 3: BaseTest.Java
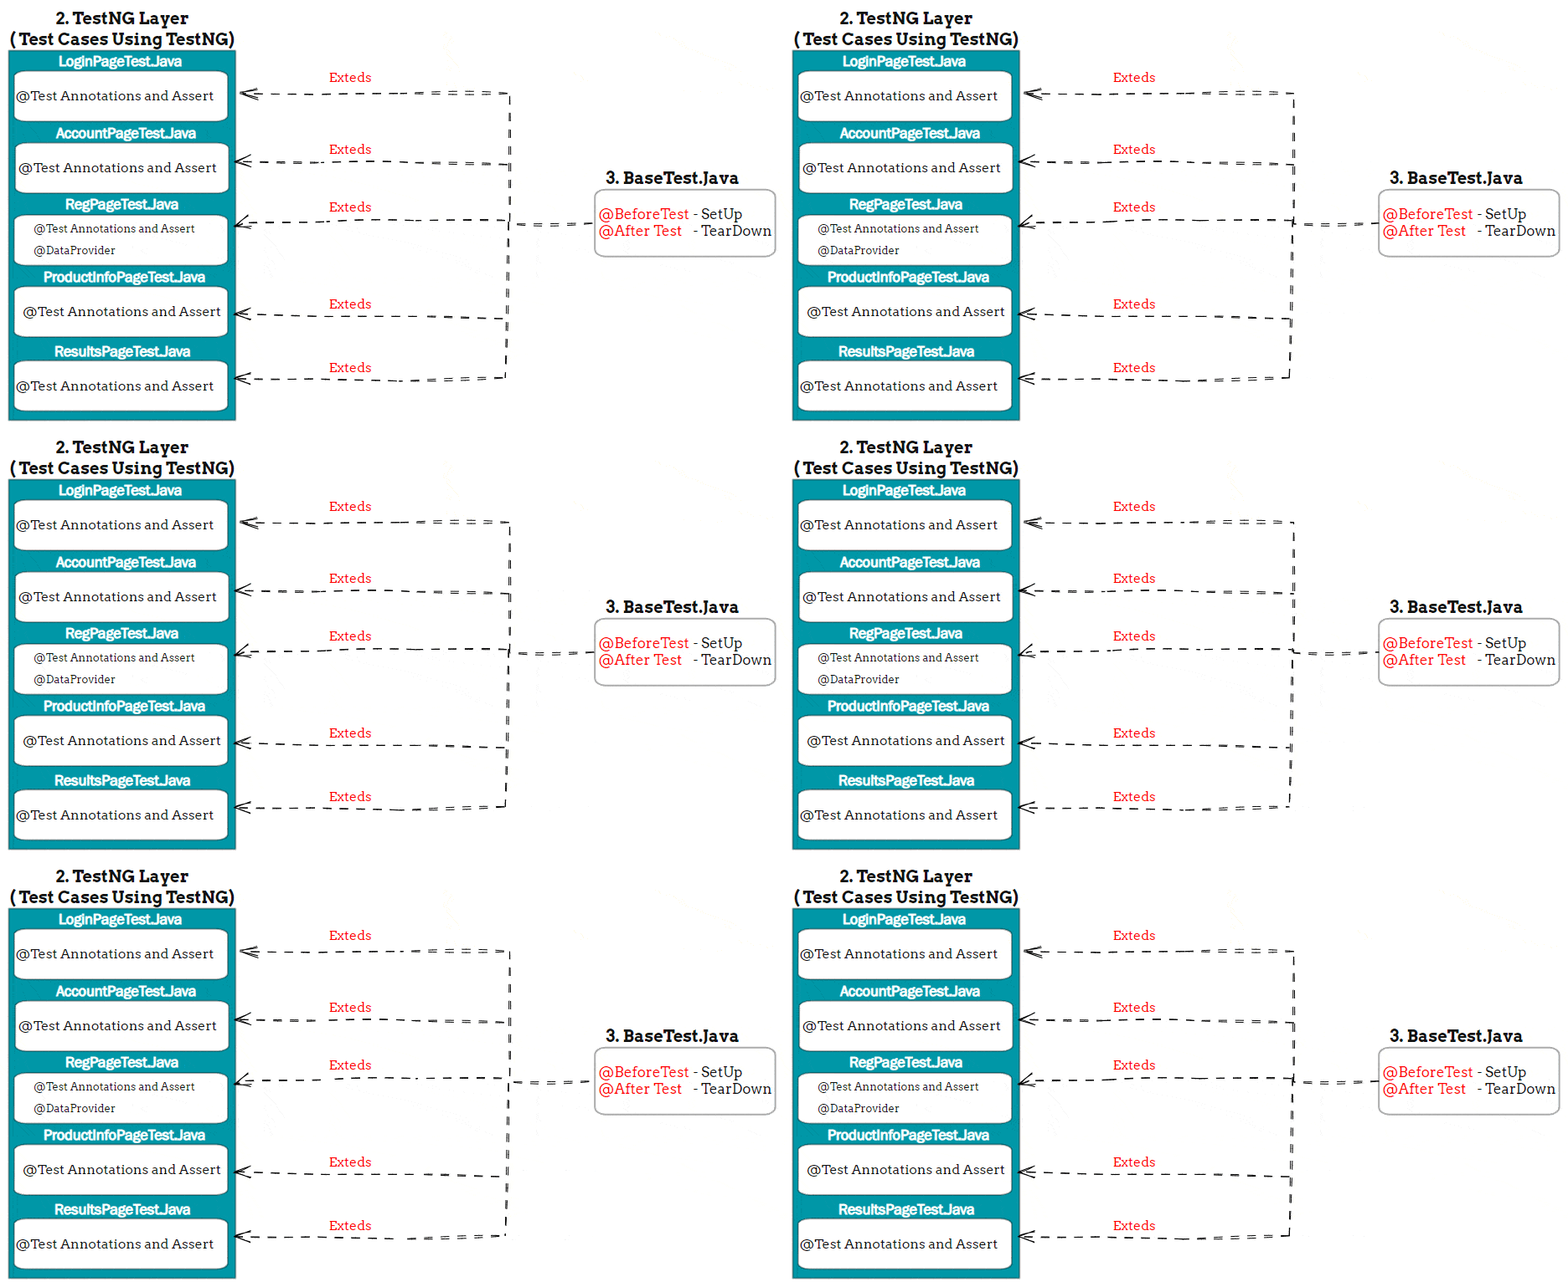
The next component is baseTest.java, which has methods like setUp, tearDown, and others. This class is extended by all the classes of the TestNG layer with the help of the extend keyword.
Component 4: DriverFactory.Java
The next component we are going to create is DriverFactory. Because if you want to perform some action, we need a driver instance. So, the basic question now comes:
How will you get a driver?
As seen in earlier programs, we have written a separate logic for the browser or driver initialization part. So, for that, let’s create a Java class called DriverFactory.Java.

In this DriverFactory.Java, we will create some methods like init_diver(), which will help us initialize the driver. But as we develop a framework, we must look for corner cases, such as on what basis:
- Which Browser ( Chrome/ Firefox / Edge )
- Which Mode ( Headless Mode )
- User Inputs like ( User Name / Password / URL )
- Other cases
We must define some Global properties to pass this information during driver initialization. To define these global properties, we are going to create one config.properties
Component 5: config.properties
We will see how to create config.properties and then maintain some global Keys over here for my framework, like browser name, headless mode, URL, and all we will maintain. But as this is a .properties file, we need a Java method to read the properties file.
So, we need to create a method init_prop() in BaseTest.Java to read the browser property from the properties file and supply the browser property to the driver to initialize the respected driver. For Example, if you want to run your test on Chrome browser, it will read the browser property and send it to the driver. In driver, we have written the logic to initialize the chrome driver.

Component 6: Utils / Libraries
To interact with the element or to perform regular operations such as sendKeys(), click(), and Selenium wait utils for synchronization and dropdown handling, we need some reused methods, so to store all such methods, we need to create utils based on their behaviour or operations.
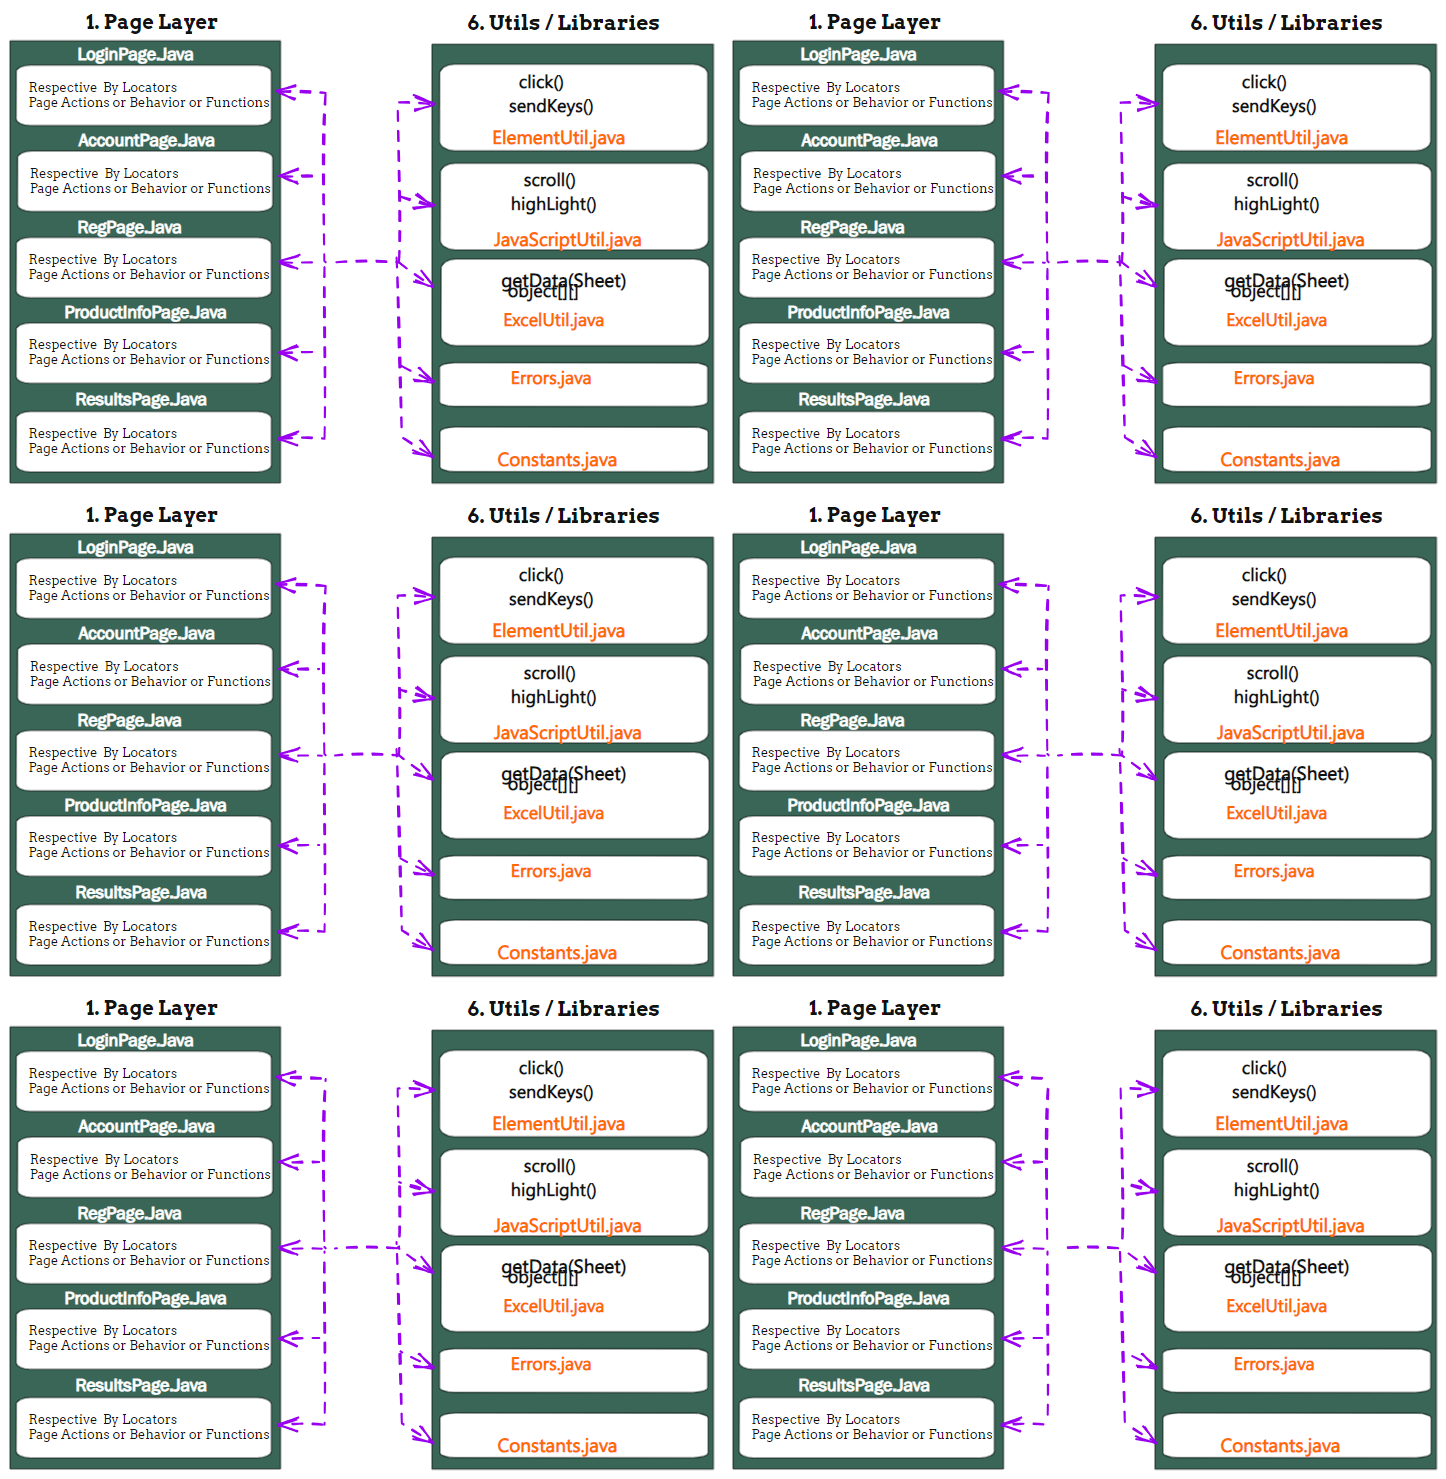
For this, we will create one more component that is Utils / Libraries, and under the utility section, we will create different utilities such as ElementUtil.java, JavaScriptUtil.java, ExcelUtil.java, Errors.java, Constants.java and others.
Then you may think about who will call these utilities, and the answer to your question is Page layer. For example, if you want to enter the username or the password or click the login button, the integration will happen between the page layer and element util methods.
We need to create that class object to call the methods of ElementUtil.java or any utility class methods. Similarly, if you want to perform any scrolling part or JavaScript utility, you will create the object of JavaScript util.
Component 7: Test Data
The next component we will create is the test data. Because test data is also important; otherwise, how will you maintain your test data? because we can not store all our test values as hardcoding values.
To avoid the hardcoding values, the best practice is to maintain the test data in an Excel file. But here, we also face the same question of how to read the Excel file. Because Java, Selenium or TestNG can read the Excel file.
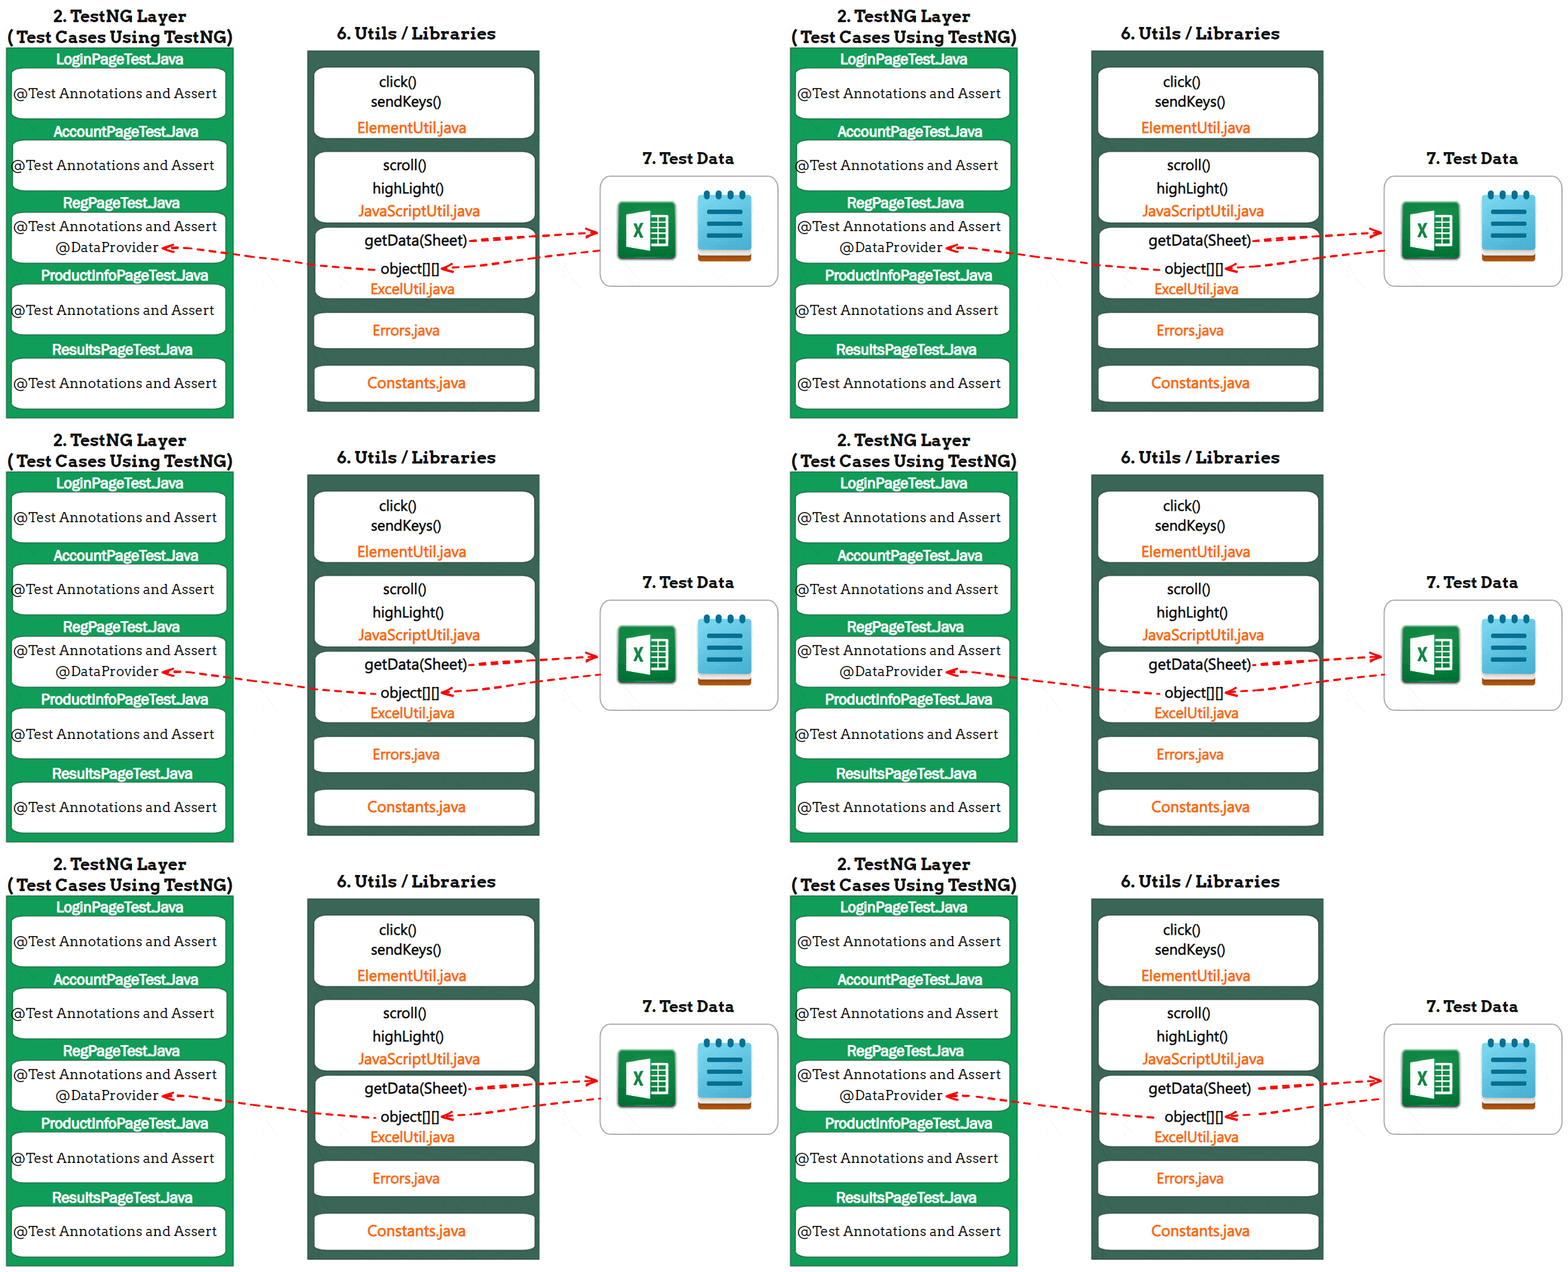
To read Excel files, we have to use some other third-party API called Apache or API, and for this, we also need to create another utility in the Utility package, which will help me to read the data from the Excel file. As the Data are stored in Row and Column format in Excel, we will have to store the data in the two Dimension object array right and this two Dimension object array.
Later, we will supply the two Dimensions of object data to the data provider and then apply the data provided to this particular test.
For example, in the registration test calls page methods, the data provider supplies test data from Excel, allowing test execution in a data-driven way.
Component 8: Reports / Logs
After every test execution, we will get a report or logs, which is also important. So, we have a variety of logs. first, the test NG will provide its own logs, but what if I want to generate my own custom logs? To generate the custom logs, we have to use Log4J API.
Similarly, when we execute, we will get the default TestNG reports, which are index.html and emailable.html. But if you want some advanced features in the report, we can use the Extent report and Allure report with the help of TestNG listeners.
Also, in some projects, when a particular test fails, we want to take screenshots and retry three or four times by using retry logic.
Component 9: Test Runners
Until this, we have created all the test cases with utility and logs but have not worked on How we want to run the test cases. So, to run the test cases, we have to create Runners, which are TestNG.xml files.
Component 10: GitHub
When we are done with the basics of the framework or the number of test classes or test cases are done, then we need to start pushing the code to GitHub. It’s a good practice to push your code in your GitHub repositories.
Component 11: Jenkins
We must create a common infrastructure to run the test cases, so we need Jenkins machines to set up the grid with the help of Docker containers, which will help us run our test cases.
